Visual UI Bug Detector using OpenAI and JavaScript
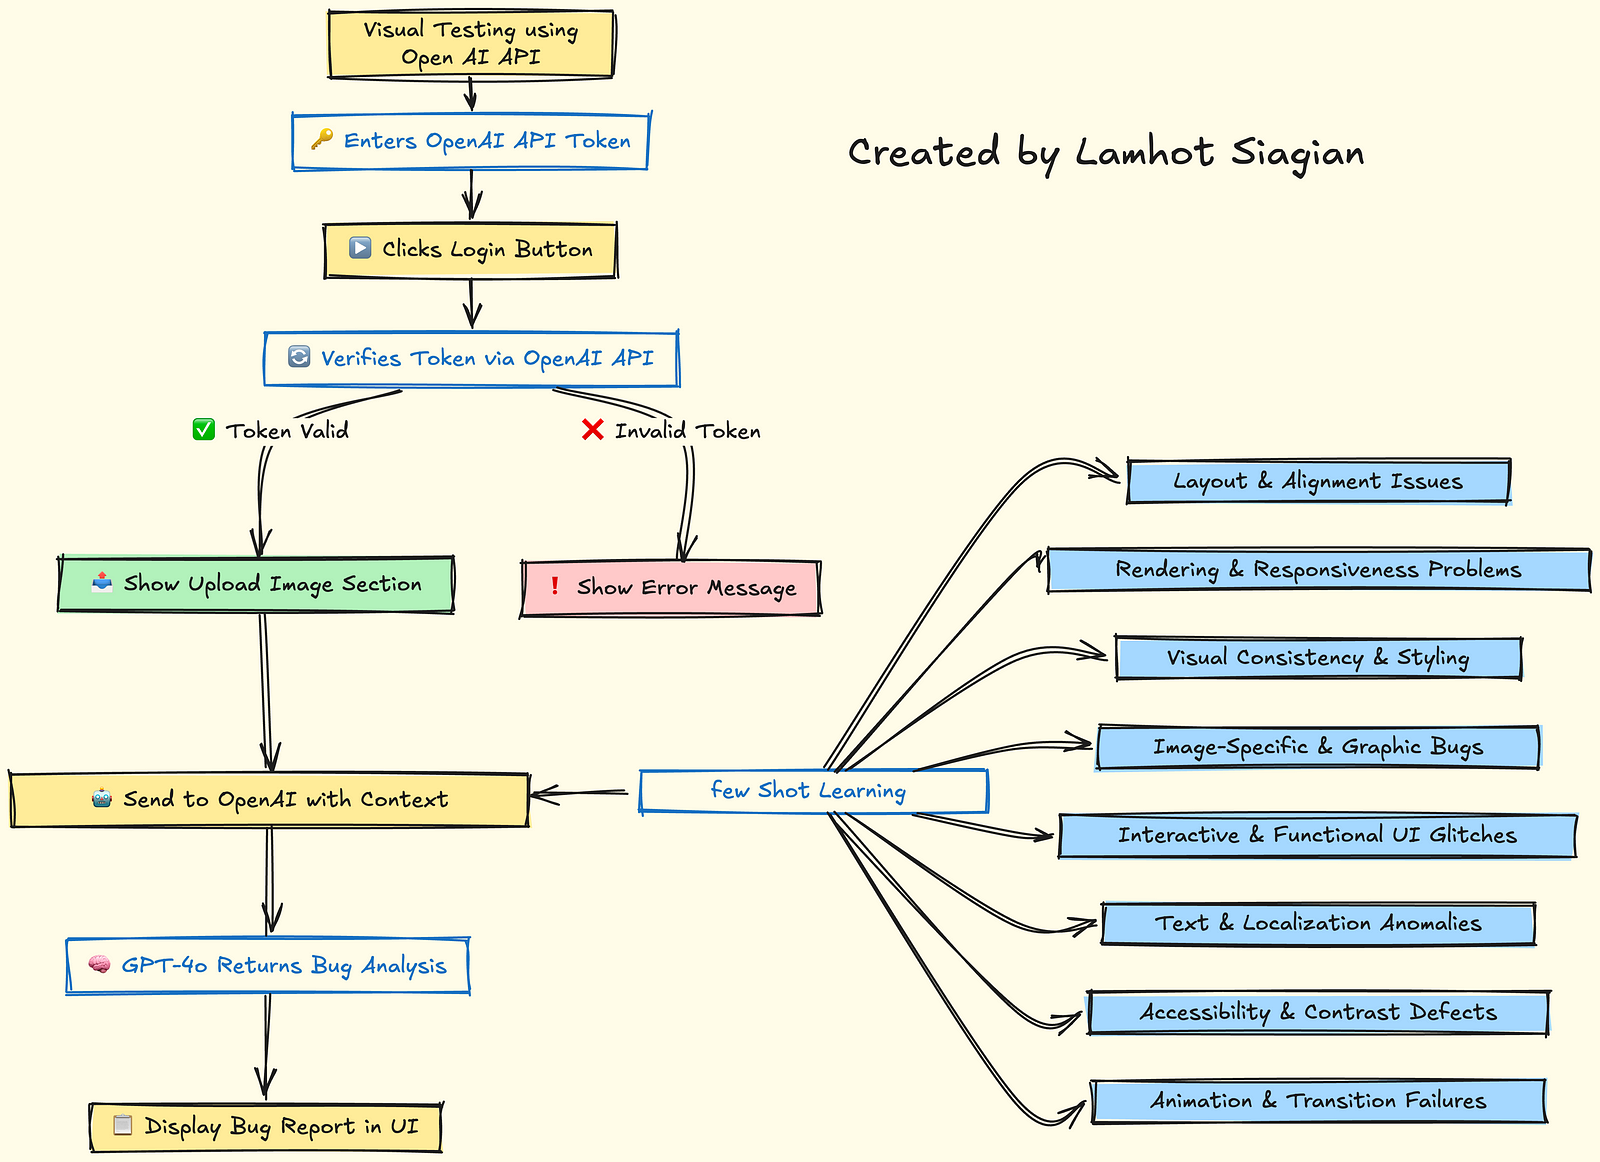
This tutorial walks you through creating a Chrome extension-like UI that lets users:
- Login with their OpenAI API key
- Upload a UI screenshot
- Send it to GPT-4o for visual bug analysis
- Receive a categorized list of UI bugs
📦 Files Overview
popup.js
Main logic for login, image selection, and GPT-4 API integration
popup.html
Basic HTML form with login and image upload
🛠️ Step-by-Step Breakdown
Step 1: Setup UI Elements in HTML
<!-- popup.html -->
<div id="loginSection">
  <input type="text" id="apiTokenInput" placeholder="Enter OpenAI API Key">
  <button id="loginBtn">Login</button>
</div>
<div id="uploadSection" style="display: none">
  <input type="file" id="imageInput" accept="image/*">
  <button id="analyzeBtn" disabled>Analyze Image</button>
</div>
<div id="status"></div>
<div id="result"></div>
Step 2: Handle Login Authentication
In popup.jsWhen the user clicks “Login”:
- Grab the API key
- Test the key using a basic request (
/v1/models) - If valid: hide login and show image upload section
loginBtn.addEventListener("click", async () => {
  const candidateToken = apiTokenInput.value.trim();
  // Validate via OpenAI API
  const resp = await fetch("https://api.openai.com/v1/models", {
    method: "GET",
    headers: {
      "Authorization": `Bearer ${candidateToken}`
    }
  });
  if (resp.status === 200) {
    openaiKey = candidateToken;
    document.getElementById("loginSection").style.display = "none";
    uploadSection.style.display = "block";
  }
});
Step 3: Enable Button When Image Selected
imageInput.addEventListener("change", () => {
  analyzeBtn.disabled = imageInput.files.length === 0;
});
Step 4: Convert Image to Base64
This allows you to embed the image directly in the API request.
const fileBase64 = await new Promise((resolve, reject) => {
  const reader = new FileReader();
  reader.onload = () => resolve(reader.result.split(',')[1]);
  reader.onerror = reject;
  reader.readAsDataURL(file);
});
Step 5: Send Image + Prompt to OpenAI (Few-Shot)
We craft a rich prompt with a hint list and examples:
const messages = [
  { role: "system", content: "You are a visual QA assistant. Classify bugs in UI screenshots." },
  { role: "user", content: `Example 1:\nBug: The 'Submit' button is lower than 'Cancel'.\nCategory: Element Misalignment` },
  { role: "user", content: `Example 2:\nBug: Blurry image rendering.\nCategory: Low-Resolution or Blurry Images` },
  { role: "user", content: `Here is an image of a UI. Based on the bug list below, analyze it:\n${BUG_HINT_LIST}` },
  {
    role: "user",
    content: [
      {
        type: "image_url",
        image_url: {
          url: `data:${file.type};base64,${fileBase64}`
        }
      }
    ]
  }
];
Send the request:
const response = await fetch("https://api.openai.com/v1/chat/completions", {
  method: "POST",
  headers: {
    "Authorization": `Bearer ${openaiKey}`,
    "Content-Type": "application/json"
  },
  body: JSON.stringify({
    model: "gpt-4o-mini",
    messages
  })
});
Step 6: Handle and Display the Response
const json = await response.json();
const analysis = json.choices?.[0]?.message?.content?.trim();
resultDiv.textContent = analysis;
✅ What This Tutorial Demonstrates
- How to securely accept OpenAI keys on the frontend
- How to convert and send images to GPT-4o
- How to prompt GPT with few-shot examples for better results
- How to classify visual bugs using AI automatically
🚀 What You Can Build Next
- Export results as a bug report
- Add support for multiple images
- Add visual annotations using the Canvas API
- Integrate with bug-tracking tools like Jira or Linear
Leave a Reply